Wednesday, May 29, 2013

Machine applique done!

Forgot to post photo's from yesterday's photo day! The weather was so beautiful outside!


This little wall hanging is with an assortment of batik charm squares that I had. The leaf shapes were traced onto fusible web and then ironed on to another 5" charm. The pattern is simple. Just layer two charm squares (good side to good side) drawing a line from one corner to the opposite, then stitch 1/4" to the side of the line you just drew, then stitch down the opposite side. Cut down the drawn line and open so you now have two squares. press the seam open.
(sorry I don't have a photo of that step. Hope this makes sense)

Step One: Using a lightweight fusible web, draw your leaves on the paper side of the web.


Step 2: Cut roughly around the leave shapes. Place the roughly cut leaves onto another 5" charm square, fuse onto the fabric.

Step 3: Let cool and then cut your leave on your traced line. 

Your traced line is not cut yet. Place your design with enough room around it and fuse this to the "wrong" side of your fabric. Then trim along your traced line for the final shape that you want to put onto your quilt
Step 4:  Peel the backing off your cut shape


Step 5: Place the wong side of your shape on top of the good side of where you want to place it (Remember once you press it on at this point, you will not be able to remove it! Make sure you are ok with your placement BEFORE you press)


Step 6: Use a simple zig zag or blanket stitch around the edges of the applique.


Step 7: Once all your squares have their leaves with the stitching completed, then arrange in the pattern you want and stich your squares together.   Step 8:  and quilt as you normally would.    For quilting, I just stitched in the ditch and put my binding on. That's it! It's a great little pattern that has endless possibilities. I liked it because I was able to practice that machine applique. If I screwed up one little leaf...oh well! I tried different fusible webbings as I didn't know which one would be easier to use.


ABOUT FUSIBLES


When you have fused your fabric to one side, you need to peel off the paper from the wrong side as well. You will note this side is dull (as well it feels a bit like there is rubber on the side you are going to fuse to the top of your quilt). The dull side goes down on the top of your fabric.

Dull Side

Good side -- this side is visible

TIPS:  when using your sewing machine to applique the edges, use a new microtek needle. I find these are much sharper and depending on the fusible that you use, will go through the layers without sticking to the needle. If you find your fabric is lifting with the needle, change your needle.

Make sure you allow the fusible shapes to cool off during each step. Do NOT try to sew these on when they are warm -- you don't want the glue from the fusible to gum up the needle or gum up any part of your machine! The fusibles have improved so much over the years. The thinner, the better for virtually invisible applique.

There are lots of uses for the fusible webbing! The Little Man got his "batman cape" from his Nana! (Trust me, the Batman logo is on the back!) The next project is Superman! (this is going to be fussy to cut out! egads!)


Then there are things like Animal Whimsy (an Amy Bradley design):


Think about the final look that you want when you are using fusible applique. You can have messy edges that will fray after many washings by using a straight stitch on the edge. If you want it to pucker after a wash -- it won't, it will remain fairly smooth. The thinner, the less "crisp" the final finish is. Experiment and see what you like.

Do you have any other creative uses for fusibles? Happy Quilting! (or should I say Fusing???)

Tuesday, May 28, 2013

My long journey with this quilt is now complete!

The quilt is back from Heritage Park and the weather was nice enough to snap a few photo's. This quilt is for my daughter's birthday next weekend. It's my design based on Lady Liberty Goes to Hawaii by Karen Stone. I started this when I first learned how to quilt (this was my second project! ha ha) It was so overwhelming that it was put away for quite a few years until I got the courage to start on it again. My daugher let me know that she wanted a "queen size". I couldn't face making any more of these squares and decided I would put lattice between the blocks and add to the side borders. The tree's were an addition that have special meaning in their placement. Every piece through the years relate directly to her life -- whether it be her love life, her work, her hopes or her dreams or memories as a little girl all the way up to the beautiful woman she has become.

Happy Birthday my wonderful girl! I love you!


My longarm gal, Karen Morrison, did a beautiful job.( also know as Queen B Quilting and a member of Nimble Thimbles Quilt Club from Airdrie)  I just love what she can do! I take my stuff to her and just let her go with it. I am hoping that she had fun with this one. It's larger than a queen and pretty close to being king-size. My daughter wanted her quilt to drop down the sides. The length is long enough that if she wants to tuck her pillows under she can do so.


 I love how Karen didn't take away from the piecing and let those point's show through. Interesting how some of the squares look to me now. The newer squares I can pick out because of the fabric trends thorugh the years.


The trees so simple in construction, but so effective on the border.


Have faith in your longarm professional. Let me tell you...though I am learning to do my own quilting, it is sure easier to pass it on rather than wrestle a king-size through your machine. Note that I have not washed or blocked this quilt due to time restrictions. Once I happen to do that, the quilting will show more and it will fluff up more! I love it even before doing that!

Happy Birthday daughter of mine!
You are loved forevermore!

Monday, May 27, 2013

Blue Jean Quilt

 The big quilt is done and I can wait another week before I hand it over to my daughter for her birthday!While I wait on fabric for my next project, I started a picnic quilt! I have been saving squares of denim for ages and knew that I wanted to make a mock cathedral.

I've searched You Tube for tutorials and found some great ones. I also tried their methods and found the seams to be incredibly bulky, despite steaming the heck out of them. So, I came up with my own way of doing it. Before anyone tells me I "stole" their idea ... believe me, I didn't research anything, I just sat and thought about how I could do it myself so that the squares would lay FLAT!

First, press your denim squares with starch before you cut them out into circles. Starch your 5" squares as well. This extra step results in a nice clean finish as well as helps the sewing without struggle. Make sure that you use a denim needle and take your time sewing. This is not a marathon, and the faster you put your foot to the pedal will result in broken needles -- uh huh! Experienced here!

I have also been collecting various 5" charm squares. I wanted this to be as scrappy as possible and I started the quilt this weekend. Spend the money and buy yourself an Olfa rotary cutter. You "can" draw circles and cut the circles out of the demin with scissors, but your hands will be killing you and you'll be cursing by the end you get a few done. The Olfa Rotary cutter is easy to use and has a ratchet handle so that you don't have to wind your hands and arms into a pretzel to get a nice circle. I won't bore you with the details of how to use it. My circles were cut a touch bigger than the 5" square. Realize I am NOT with the quilt police and nor do I believe that this particular quilt needs super close measurements. It's a picnic quilt for Petey sake and it will have ketchup and mustard on it, along with grass stains and beach sand ground into it. You get the picture!


Get some varigated thread, or whatever colour you want and stitch the square onto the circle corner to corner, WRONG SIDES TOGETHER.

The next step is to use your Hera marker along the edges of the 5" charm square. This doesn't mark your fabric, but "dents" it. A Hera Marker is made out of hard plastic. This puts a visible seam in your denim so that you can turn it and press it over onto the printed cotton side. I used one of my older cutting mats and pressed quite hard on it so that it would give me a nice area to fold. It works! I was surprised, but when I say "HARD" I mean it! lol


Take your square over to the ironing board and press the seams down.  (You will be bringing the right side of the denim over to the top of the right side of the cotton. ) You'll notice they (the folds) are not perfect, but they will be fine when you get top stitching.


Take your pressed square back to your sewing machine and top stitch the edges of the denim through the layers. Note that the edges, once washed, will fray nicely. I stitched a bit smaller than 1/4" (remember, you don't have to live by rules here! Keep the stitching to "about" 1/4")


Once you have two completed, top-stitched squares -- stitch the two squares together with a zig-zag or similar decorative stitch. The key here is you want the needle to go into both sides (left square to right square) to hold them together.


Once you have two squares done, do another two squares. Then stitch those 2 square rectangle onto another 2 square rectangle to result in one 4 square unit. Then sew 2 Four Square Units together....


You will need to keep sewing a four square unit to the right of your long strip until you reach the width you desire. Note that you don't want to keep adding and adding to make larger squares. You want long strips, no wider than 10" across. You are limited in the amount of room you have on your sewing machine. Trust me -- denim is heavy, so you want to make this as painless as possible. Stay tuned and I'll show you the end result once I complete it!

I'm really pleased with the way it's turning out! It's heavy enough and NO you do not need to put batting in it! I think it's going to be a great addition to our outings!


It will be a while before I post the finished product!


How many pairs of jeans? I'm guessing you need to start with at least 6 pairs of men's jeans. If you don't have enough -- you can always ADD to the quilt as you go!

Happy Quilting everyone!

Saturday, May 25, 2013

Festival of Quilts - Heritage Park May 25 and 26, 2013 = Inspiration

Well the day finally arrived! I put two quilts in and only one got into the publication with all the quilts listed. Strange, since BOTH were submitted the same time. The one quilt that I wanted published, actually wasn't published. *sigh* My daughter's birthday quilt is done and it would have been nice to pass along a brochure with it as well with the write up.

As I walked into Heritage Park, I decided to go into the "haunted" house, Prince House. Apparently, it is supposed to be haunted, but if anything it's a beautiful house and I was thrilled that my daughter's quilt was in the room as soon as you enter. One of the volunteers was there and she took down the information on her quilt as it wasn't published.

Here is is! The far left. Great that they allowed the fun back to show. Was very exciting to see it!


Here's the new owner! My wonderful daughter! Can you believe that she's going to be 30? YIKES! Good thing she looks like a teenager, makes me look that much younger! ha! Happy Birthday my girl! You will get your birthday quilt once it's home from the show!


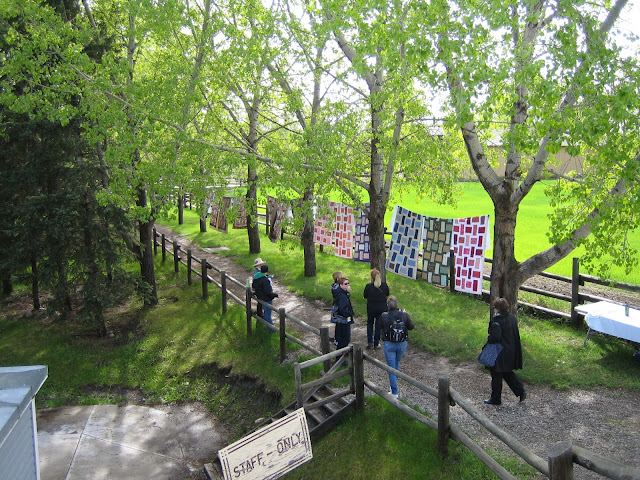
I love how the quilts hang on the line outside! We had a forcast of rain, but it quickly dried up. I was happy to be able to take a couple of photo's of the quilts outdoors!

Of course my trip wouldn't be done without a photo of the quilts hanging off the hotel! The rain had just stopped and the sun started shining. The men on duty were hauling the quilts out along with the ladders and the women were hanging the quilts!


I love seeing the simplicity of the quilts come alive with the quilting! This person did a fantastic jobwith the quilting. I absolutely love the triangles! How splendid! Doesn't this give you the ompfhhh to want to get behind your sewing machine????


Beside my lovely daughter's quilt .. this next one has to be my absolute favorite! Look at all those little muchkins dressed up in costume around the quilt! Fantastic job! Love it!


This one was quite striking. The bold colours topped off with the wonderful hand stitching! I was surprised to see that it was signed in gold right on the front of the quilt with a signature. Something I've never seen before!


I took a close up of this one. It was made from jelly rolls, sewed across in strips. Nothing too outstanding, until you got up real close and noticed that the maker used a different style of quilting for every row! What a great way of learning your stitches and giving your simple quilt some pizzaz! I am new to free motion, but this would be a great way of practicing and getting a quilt out of it!

There were so many beautiful quilts! One, right after another. This one caught my eye. The whole quilt was quite spectacular. The hours that were spent on this one I am sure would add up to months. Just take a look at the incredible detail on this! I think that some thread company out there would be wise to snap this gal up to showcase their threads! Amazing job! Oh one day I wish I could be a touch as good as this person!

Ever wonder what do to with all your scraps? Look how beautiful this scrap quilt is!

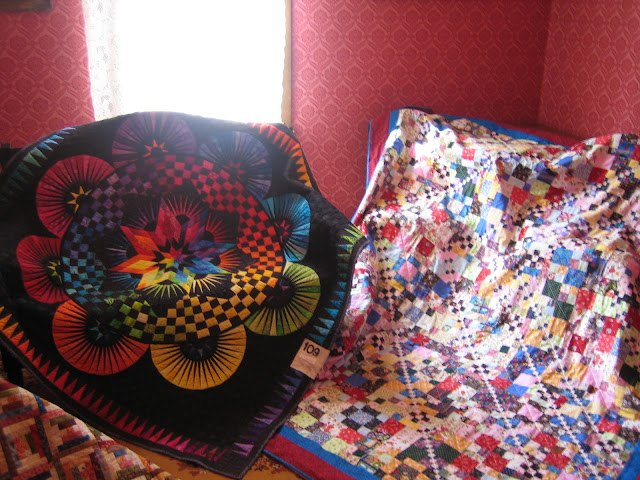
I so wish I could have seen these two quilts spread out, or hung from the hotel. Sometimes you want to see the pieces as a whole. Take a look at those incredible points on the round pieces to the left.
The right quilt, great again with those scraps!

I've never seen this pattern. Makes me wonder if this is an original design? (This quilt below is by Wayne Kollinger -- read his comments below!)

I love the bright colors! What really struck me with this were the black and white dotted fabric for the points.

It seemed that there were not as many quilts as last year. They have been advertising there were 800 quilts, but maybe with the rain, it was harder to see them all?

The vendors were the same. Nothing new to see really. I am afraid that I fell off the wagon though and I did buy some patterns and a few things that I needed to replace -- markers, tape measure. I found a cute little snowman pattern in a jar that I'm going to stich up for my desk at work (of course, brining it out when the snow starts to fly! ha ha) I found a great pattern for a baby quilt. I will show you once I make it!

All in all, it was ok. I think that I enjoyed it much more last year, being it my first year to participate. Seems that there was really nothing new other than the wonderful applique collections they were showing. I am thrilled to be completed my daughter's quilt. I am sure it will be a wonderful addition to her new place that she's moving to!

Hope you all enjoyed my little tour and ... Happy Quilting all!

Margo

Monday, May 20, 2013

Quilt Hanging Sleeve, "D" style hanging sleeve


Start with fabric that is 8" in length. The width will need to be as wide as your quilt (less 1"). The sleeve needs to fit inside of the back of quilt beside the binding. Your final sleeve should be no narrower than 2" on each side.


On each side of your long strip, fold over 1/4" press, then fold once more 1/4" and press. Top stitch the ends.

Your next step will be to fold the whole length in half. Then press each edge to the middle. Press the folds. (I used starch on these as you want to be able to see these crisp folds in a few minutes!)


You then unfold the length of your sleeve and put the raw edges together, with WRONG sides together.


Sew along the length of your sleeve with a 1/4" seam.


You will note your finished side edges will be on the inside. The lengthwise seam that you just sewed will be on the outside (showing on the good side of the fabric....don't panic! This is the way you want it to look!)


This is the trickiest part. You will note that my pointer finger is on one of those earlier pressed fold. The lengthwise seam you just sewed is positioned close to the middle. My thumb is just before the second pressed fold (it's off kilter and both folds will not equally lay flat. Don't worry about this -- you want it to look this way!) 


 Remember that you do not want to disturb your previous folds that were pressed, but you want to press open the seam you just sewed.


If you do not have the little Clover iron, you can use your regular iron. Be sure not to disturb the edge that had the previous pressed fold.


Once you are done pressing the center seam, you will note that the sleeve is now in a "D" shape. The flat part will be laid against the back of your quilt. You will be sewing the pressed folded seams to the back of your quilt. The purpose of the "D" shape is to accommodate rods to slide through the sleeve to hang your quilt.


I positioned my sleeve approximately 1" below the edge of my binding on the back of my quilt. I first found the center of my sleeve, then positioned the center to the center of my quilt.

Pin the top pressed fold all along the top of your quilt. Make sure that you measure along the length so that your sleeve will stay consistent. I found that leaving 1" on the top, gives the "D" sleeve enough room where it does not pull beyond the top of the quilt when you hang it up.


Then, start sewing this pinned side down to the back of the quilt. Make sure you have a hand behind (on the right side of the quilt) so that you don't stitch right through to the front. You want your stitches again to be invisible.


Once the top of the "D" sleeve is sewn -- lay the back of the sleeve flat against the back of your quilt. You will note that the top (the curve of the "D") will be bubbled on the top -- that's perfect! Pin and then stitch the bottom side of your sleeve to the back of your quilt.

You can flatten the "D" sleeve by pressing it if you are giving it as a gift. The new owner then has the option of placing it on the bed, or to hang it on a wall.

This one will be going into Festival of Quilts at Heritage Park here in Calgary, so I am hoping they put the sleeve into good use! It is a long overdue gift to my eldest! She turns 30! OMG! I'll post photo's of the whole quilt later!

There are lots of ways of making sleeves. Sizes vary depending on your needs. Check it out and see what works for you. I ignore the Quilt Police and do what works for me! I hope that these instructions help you with your first sleeve! If you have additional tips - feel free to add them in the comment section. I'll do my best to drop by now and again to make sure they are posted!

Happy Quilting!