Showing posts with label binding. Show all posts

Saturday, May 16, 2015

Ugh! Binding

Well I do love to hand stitch, but having to wrestle the quilt all around is not my favorite, but sitting and stitching the binding by hand to the back is my absolute favorite thing of the whole quilting process! Especially when it's fun fabric like this!


One of the other things that I always struggled with is how do you get all the binding on without having a mess of a binding pile next to your chair? I know some people wind it around the foot of their extension table of the sewing machine...then someone said to wing it over your shoulder while you feed it onto the top of the quilt as you sew. I was thinking that I hated both ideas! I have to find something that would 1. not cost any money, 2. was easily at hand and 3. worked to unwind the meters/yards of binding so it wouldn't tangle! I remember having to stop and untwist the binding so I could continue sewing! That is until:


You got it! an empty toilet paper roll! This my friends is is 26 feet of binding. Now the next question was "where the heck to you put this? Do you let it roll along the floor at  your feet? " No! Then I'd have the same problems I had before. I know this isn't a bid deal and I am sure that along the way someone will develop a "Binding Assist Tool"

This seems to work fine!

I have my set of chopsticks and skewers -- which by the way are great tools to turn tubes and make corners nice and pointy! My oldest made this great ceramic holder for all my things...scissors, pins, and chopsticks of course! I was able to put my toiler paper tube with my binding over the chopsticks and it was slick I tell you! unwound perfectly while I was stitching that binding around the gigantic quilt! 


It may not be the prettiest "tool", but it sure worked exactly the way I wanted it! I even had left overs that I was able to save and put into my basket of all the other leftover binding! I always have extra, and make extra on purpose so I don't have an excuse for those little projects!


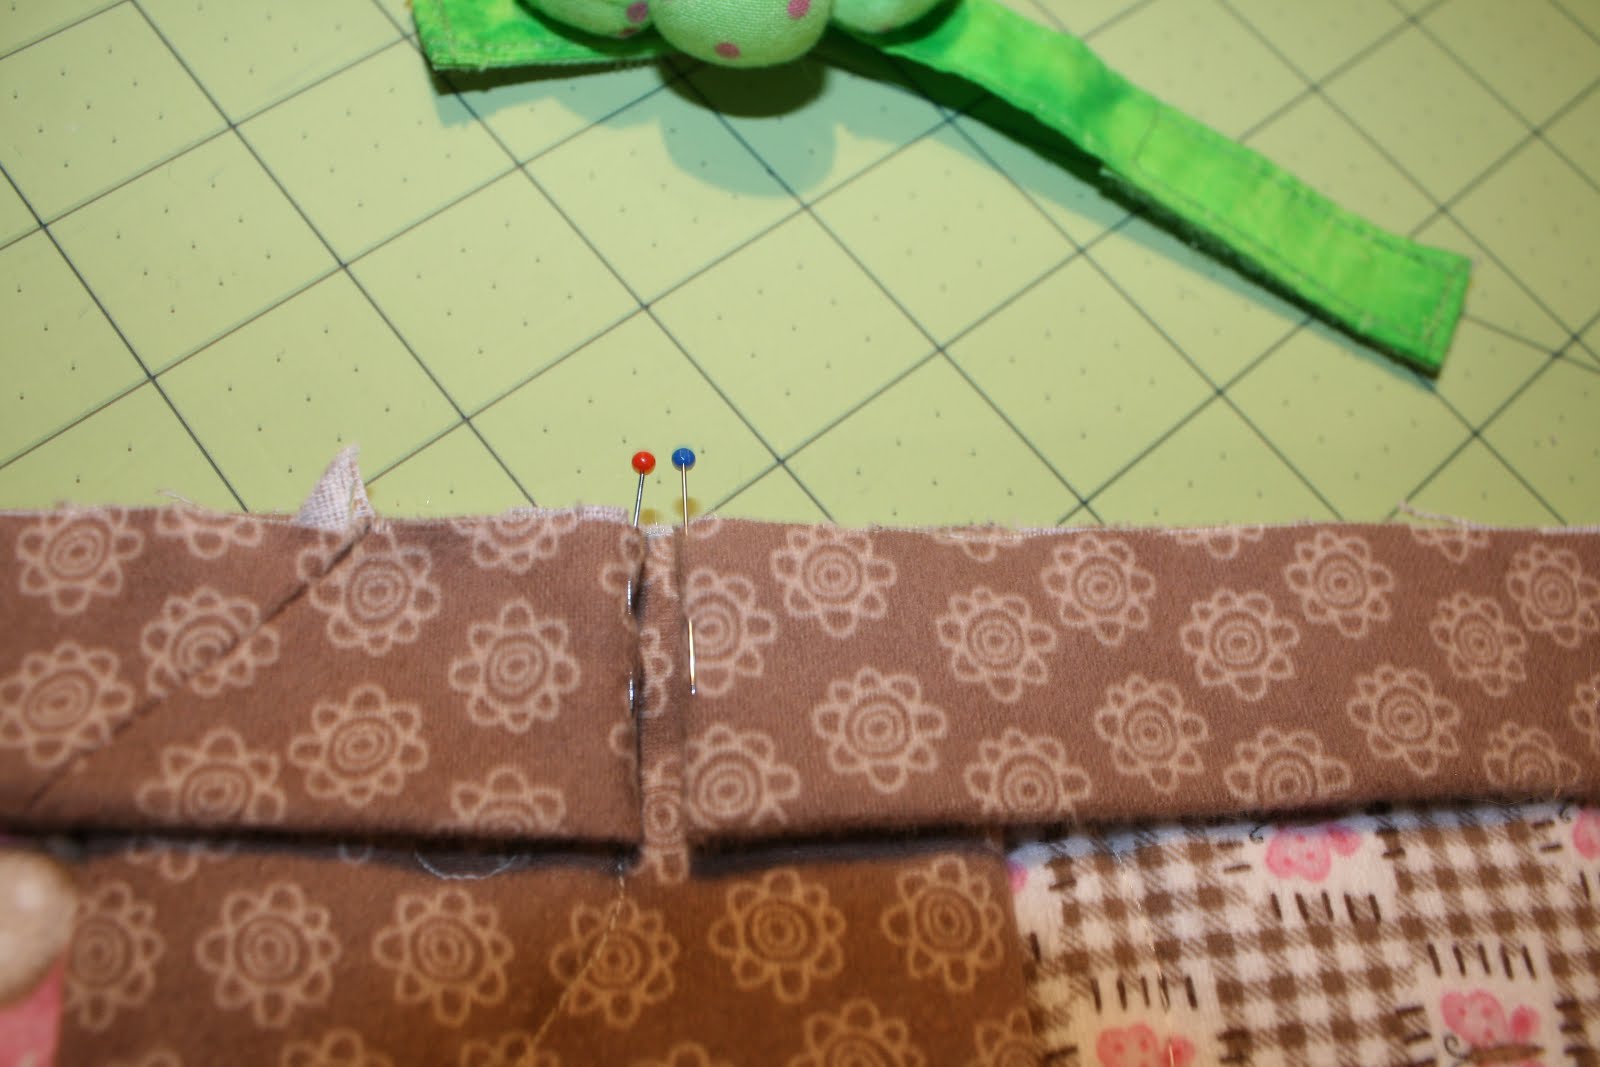
One of the other things I always hated was using pins to mark the last quarter inch so I can turn my binding around the corners. A quick solution to this was the tape  you use for marking rulers! A nice quarter inch that's easy to see! You can use it over for all your corners and not worry about being inaccurate in those corners. I could easily stop in the exact place I wanted to without squinting as to where a pin was.

Just so you don't think I am boycotting "tools" - I did order the Superior Threadholder from Mass Drop! It was a great deal, so I didn't hesitate to get it! I love that it has an adjustable arm and also a way to hold all different types of spools! I didn't struggle once with my thread tangling or toppling over when Tigger decides to squeeze through places he shouldn't be!

Oh and a PS to the Youngest one....I cut the binding at 2" and it fit's just perfect! That is my new go to number!


Believe it or not - there is a You Tube video on how this thread stand can be used. It was probably the best little video that really showed me a lot about this tool. You know how you just "have to" have a "tool" and by the time you get it home, you forget about all the capabilities? Just another reminder to me to check out those tools as well on You Tube and see if I can get more use out of them!

This morning, I sewed the last bit of binding on the machine. Good thing, as I have a horrible cold. I'm now all set up with my box of kleenex, drink, snacks, thread and the quilt.... hand stitching the binding to the back! It's soothing the soul and I get to look at the wonderful fabric for the binding! I am hoping that on this long weekend, we may have a sunny day so that I take photo's of the finished quilt! It goes into Heritage Park Quilt Festival on Tuesday -- so I have my work cut out for me!

Enjoy the long weekend to all my Canadian Friends and Happy Quilting to you all!

Margo


Monday, May 20, 2013

Bindings

I absolutely LOVE the way that hand sewn binding looks. Good hand sewn binding. This is the step that I absolutely LOVE. I find hand sewing very peaceful and calming. It finishes your quilt so nicely. I know there are people out there that absolutely HATE this step (aka my youngest) -- but this is such a crucial last step.

There are people who machine sew their binding on and love it. My choice is to finish it with hand sewing invisibly so it finishes the quilt. I figure you spend enough time on the quilt that you want it finished as smoothly as you can. I do use the machine to sew the binding on. (See my post on sewing on binding). This is the last step to finish that binding.

Just like you use the proper tools for cutting, you need the proper tools for finishing. In my experience, I find that the people who hate hand sewing are using the wrong needles and their stitches are showing through like stitches on Frankenstein -- they are NOT invisible. The trick to this is to use the proper needle. It needs to be sharp, it needs to be thin as possible and you want it to smoothly glide through the fabric. I have used all sorts of needles, long, short, sharp, applique, all-purpose. I always buy new needles as they come out and try them.  I finally found one that I think will be a keeper for a long time to come! "Clover Black Gold Needles Applique/Sharps (No.12)"


I like the way it goes through the fabric. It doesn't stick or pull when it glides through the fabric. It is incredibly sharp so that I can grab a few strands of fabric resulting in those invisible stitches, yet securing the binding on the back. The trick to getting invisible stitches is to run your needle under the binding into the back layer of the quilt, then pick up a few threads on the edge of your binding and pull your thread through. put your needle back into the back layer of the quilt directly under the stitch and run your needle again about 1/8" away from the stitch you just made. Practice, practice, practice to get these small stitches. Match your thread to your BINDING color.  These invisible stitches are great to use for your labels as well as your hand-applique.


I have enlarged the photo to show you where you go into the fabric (back layer of your quit) and approximately 1/8" into the binding. When sewing, I try to get as close to the edge of the binding as I can. Take a look again at this photo. The binding is already completed and hand-sewn to the back and you can't see any of the stitches! This photo is just to show you needle placement.

Remember, you can sew on the binding to the front with a 1/4" seam. You then fold it over and start hand sewing!

BINDING SIZE:

I've been using strips 2 1/2". I found that when you turn it over to the back, there is a larger finished binding (wider) on the back than on the front. I then tried 2 1/4". Same result for me. I have now tried a 2" strip and found it works great!

Remember, the strip width will all depend on how thick your finished quilt is. If you are using flannel and/or a thick polyester batting, I would use the 2 1/4" strip. If you want a rounded finished binding (so it looks like cording) -- use a smaller width binding.   Note that you will really need to pull it over to the backside when you are sewing (this can be really tiring on your hands!)

When you pull your binding to the back to sewn on -- you want to make sure the edge of the binding on the back covers your stitches front the front. The narrower your binding strip, the harder it is to pull the front to the back. The last two quilts I have done, I have used 2" binding strips.


I use single fold binding. 2" folded in half = 1" binding. I then sew the raw edge to the raw edge of the quilt using a 1/4" seam. Since there are two layers against the edge, it wears better. 

Making binding is easy! There are loads of tutorials on line. I have made continuous bindling and I have also made my own binding using strips and sewing them together. Some people say that bias binding wears better as the grain of fabric is on an angle on the edges. I have cut strips along the grain and have found no issues with it. Try each method and see which one you like the best and the easiest for you!

Hope that I haven't confused you! Happy Quilting everyone!

Sunday, January 20, 2013

"Mom can you...."

The call: "Mom , I'm sending you a package" me..."OK" "If you can help me that would be great" me... "Oh/" "yeah, I HATE binding and I need it for the beginning of February" me..."WHAT?" "yeah, I know, it's short notice" me... "um...I guess I have no choice?" "Well it's in the mail" me..."hahahahahahahahahahahahahahahahahaha: The girl OWES me BIG!!!! The purpose of my posts is to encourage those new to quilting! I am not an expert in any way and I am learning just like the rest of you. Trial and error. I hope that my posts motivate you and help you along your own quilting journey! I am trying to pay it forward so to speak in response to all of those quilters out there that encourage me every day! I read your posts and thank God for the internet! Ya'll are amazing! (ok....so I'm not Southern, but I am so envious of those of you who grew up in quilting homes!) So for those of you who HATE binding...he's a few photo's that I hope will make it easier! I use 2 1/2" strips, joined together and folded and pressed in half. I start sewing it to my quilt about 12" down the binding and always start on the middle of one side of the quilt. I sew 1/2" on top and normally use my walking foot so it doesn't bunch on the bottom. (this is after you have trimmed the quilt) The corner is a new tip that I tried. Sew to the corner like so:
Then fold your binding upwards, then back down (you'll notice that my seamline is not perfect, so those "Quilting Police" can keep their comments to themselves!)
Put it back in your machine and sew from the very top down to the next corner (you'll notice that I don't do the pin thing 'cause I'm lazy!)
When you reach the side that you started on, end your binding with an opening about 12". You then want to fold both sides with about 1/2" open. Mark (see the pins) This is where you will sew the binding together.
Before you trim -- place the binding down on your quilt to make sure it lays flat. You want to make sure it is a perfect fit. Trust me, it's much easier to open this seam and take in a bit more if it it doesn't lay flat or there is too much binding. Once you are good to go, trim the ends of that binding to 1/4" and then finger press the seam open, fold the binding back in half and sew down the rest of the binding.
VOILA! Practice makes perfect! I hand sew the binding to the back of the quilt with small stitches, using thread that blends in with the binding. I have tried to sew the binding on in one step, but personally I don't like the look of seeing a seamline on the front and back on the binding. I love how it is invisible by taking the time to hand sew the back. Personal taste is all! So my youngest...your quilt is now on it's way back to you. It's sure to be loved by the little wee one that you are gifting it to! Next quilt, you are on your own! I'll talk you through it!
Happy Quilting all! On to the next big "secret" project!