Sunday, March 3, 2013
Motivation - Part 2
So this is the quilt in the works. I think I finally figured out where my lack of motivation has gone -- despite being physically tired from work. (That's being checked out by the doc). I am beginning to think I have been dragging my feet on this project because it's been so long in the works. I had a passion for it when "Lady Liberty Goes to Hawaii" was first printed many years ago. My daughter, the oldest, also fell in love with it and insisted that it become hers. It was meant as a wall hanging, but then I had to modify it so it would fit a queen size bed. Now that in itself is not so bad, but the pattern iteself...all those little 6 1/2 " squares pieced with perfect points. I can't even tell you how many times I ripped out points only to start over again. Just the thought of doing these squares over and over again for it to fit the top of a queen size literally terrified me. I am one of those people with OCD -- not that they diagnosed me, but I am an "A" type personality. I like things "just so". I like everything in it's place. Now along with that, I have a hard time starting a new project because I feel terrible guilt over projects that are not completed. Maybe it's from my past marriage where quilting was not supported at all. I got the "are you doing that AGAIN?", "Why are you buying fabric, cutting it up and only putting it together again?" -- Joking aside, he was serious and was furious about "wasting his money". I was a stay-at-home mom working part time. I digress..... needless to say, I think it's the fact that there is a project there that I brought from my past that I am trying to complete now. It brings back past memories, good and bad. Every little piece of this quilt has fabric that has a "story" and with it, memories. It has been a long time coming to fruition. The Chef says it is "amazing" and compliments me and see's the beauty of the whole thing. He's been the one encouraging me to continue and doesn't say a word when I start a new project. He doesn't remind me of the one's that are sitting in progress for another day. He looks at it all a little wide-eyed and says that he's so proud of my creativity. So, I plug along.....
Saturday, March 2, 2013
On the design wall....where did you go motivation?
I'm working to complete a quilt for my daughter's 30th birthday coming up. It's been a project of love and has been a long time coming since I started this along with my very first quilt back in 1996(?) LONG TIME!
Working full time sure cuts into my quilt time. I know people say it only takes a few minutes a day, but I'm dead tired by the time I get home from work. I am loving my "15-minutes of Play" by Victoria Findlay Wolfe. Her book is fantastic! Maybe one day I'll actually get around to "made fabric"! The one HUGE lesson that I got from it -- 15 minutes a day -- that's it. Start by taking 15 minutes a day, devote 15 minutes a day to just "play". I've been taking her words to heart and have been doing just that. Even though I may be exhausted (ok, no cutting fabric when exhausted with a rotary cutter!)..but I am putting in 15 minutes a day into my studio. Whether I'm cutting, sewing, organizing, folding fabric -- minimum, 15 minutes a day. Thanks to Ms. Wolfe for her words of wisdom! For months I was frozen after work, sitting in front of the television, stagnant! (I do have a tv in my studio, but somehow I didn't get up there).
So motivation has been a huge thing for me. Fifteen minutes is nothing -- but in the scheme of things, I am frozen....mentally frozen. I had taken a week of vacation earlier in February and it was great! I took the time to head to the studio daily and work on my quilt. Now, back to work, I am exhausted again when I get home. Maybe it has to do with work, rather than creativity? :-)
Any suggestions would be great! Meantime, I'll work on going in there 15 minutes a day!
Happy Quilting everyone!
Saturday, February 2, 2013
Quilting Design Board
Well I finally did it! I re-did the design wall in my studio (with the help from Chef). I wanted it inexpensive and functional. I read other blogs, tossed the idea of what colour (grey? white?) or do I use quilt batting(more cost). What if it turns out like crap and I've wasted all that money?
Off to Rona (Canada's Lowe's or Home Depot, Home Hardware) and checked out the board that I could put it on. I read people saying that blue styrofoam, but at $27.00 a sheet for a project that wasn't guaranteed to work, I was hesitant on outlaying that cash. Besides, the more I can save from this project the more I have for fabric! I settled on two sheets of 4' x 8', 2" styrofoam board.
The next question is, "How do I want it on the wall?" Do I want it up and down with the length from the ceiling to the floor? If I do that I have to consider a wall plug as well as the width of the baseboards. Also, will I really be getting down on my hands and knees to put designs on the bottom? I have a hard enough time getting up and down from the floor playing cars with the little man. How do I want to position it? The other question is how much of the wall do I want to cover? I ended up deciding that I want the boards to get lenthwise from left to right, starting at the top of the ceiling and down to the top of the wall plug, meaning there would be about 15" from the floor to the bottom of the design wall (which suits me just fine!) It's a little higher than Tigger is willing to stretch to scratch it all to heck!
How DO you cut styrofoam without it chipping? I heard years ago that the best way to cut styrofoam is with an electric knife. I have no electric knife, but I do have one with a similar blade! Of course my quilting rulers came in real handy! I cut a foot off the width of each of the boards (also in mind to fit the fabric that I had planned on using....though that in itself was a math dilemna for me! ha ha)The knife cut through it like butter with only a few minor chinks out of the styrofoam on the bottom edge. That edge of course I could put to the wall side.
Next was the challenge of fitting the fabric on. Do I want to staple it or just tape it? Tape here we come. Chef found some "tuck tape" that is a little lighter than duct tape and just as easy to attach as duct tape. It held the fabric easily and there was minimal glue residue on the edges (I find duct tape has some of the gluey bits sit on the edges of the tape). Between the two of us, we managed to stretch the green flannel (yep the whole room is green, so I thought rather than have it stick out, I wanted it to blend in with the walls a bit more).
I read different methods of affixing the boards to the wall. I decided to choose the "Command" glue strips. I heard a lot of success stories and I liked the idea that I wouldn't be plugging the walls with more holes. I wanted it smooth on the front and the idea of having an electric screwdriver going through the fabric kind of put me on edge! The result was a fantastic finish! The people who used command strips said that it didn't fall off the wall. I made sure that I affixed a lot. The ones I bought each individually held 16 pounds. I put four across the top, then four across the middle and four across the bottom. There is a "bit" of a gap with the both of them together (you'll see it closer to the right corner of the wall). Nothing that was too horrid.
My total investment was $40. ($10 each for two styrofoam boards, flannel fabric, roll os tuck tape and command strip refills). Those of you in the U.S. would probably get it even cheaper yet! Not bad for a design board. The size that I have is 8' across by 6' from the ceiling to the bottom of the wall. Enough for me!
Good luck on your design wall! Happy Quilting!
Sunday, January 20, 2013
"Mom can you...."
The call:
"Mom , I'm sending you a package"
me..."OK"
"If you can help me that would be great"
me... "Oh/"
"yeah, I HATE binding and I need it for the beginning of February"
me..."WHAT?"
"yeah, I know, it's short notice"
me... "um...I guess I have no choice?"
"Well it's in the mail"
me..."hahahahahahahahahahahahahahahahahaha:
The girl OWES me BIG!!!!
The purpose of my posts is to encourage those new to quilting! I am not an expert in any way and I am learning just like the rest of you. Trial and error. I hope that my posts motivate you and help you along your own quilting journey! I am trying to pay it forward so to speak in response to all of those quilters out there that encourage me every day! I read your posts and thank God for the internet! Ya'll are amazing! (ok....so I'm not Southern, but I am so envious of those of you who grew up in quilting homes!)
So for those of you who HATE binding...he's a few photo's that I hope will make it easier! I use 2 1/2" strips, joined together and folded and pressed in half. I start sewing it to my quilt about 12" down the binding and always start on the middle of one side of the quilt. I sew 1/2" on top and normally use my walking foot so it doesn't bunch on the bottom. (this is after you have trimmed the quilt) The corner is a new tip that I tried. Sew to the corner like so:
Then fold your binding upwards, then back down (you'll notice that my seamline is not perfect, so those "Quilting Police" can keep their comments to themselves!)
Put it back in your machine and sew from the very top down to the next corner (you'll notice that I don't do the pin thing 'cause I'm lazy!)
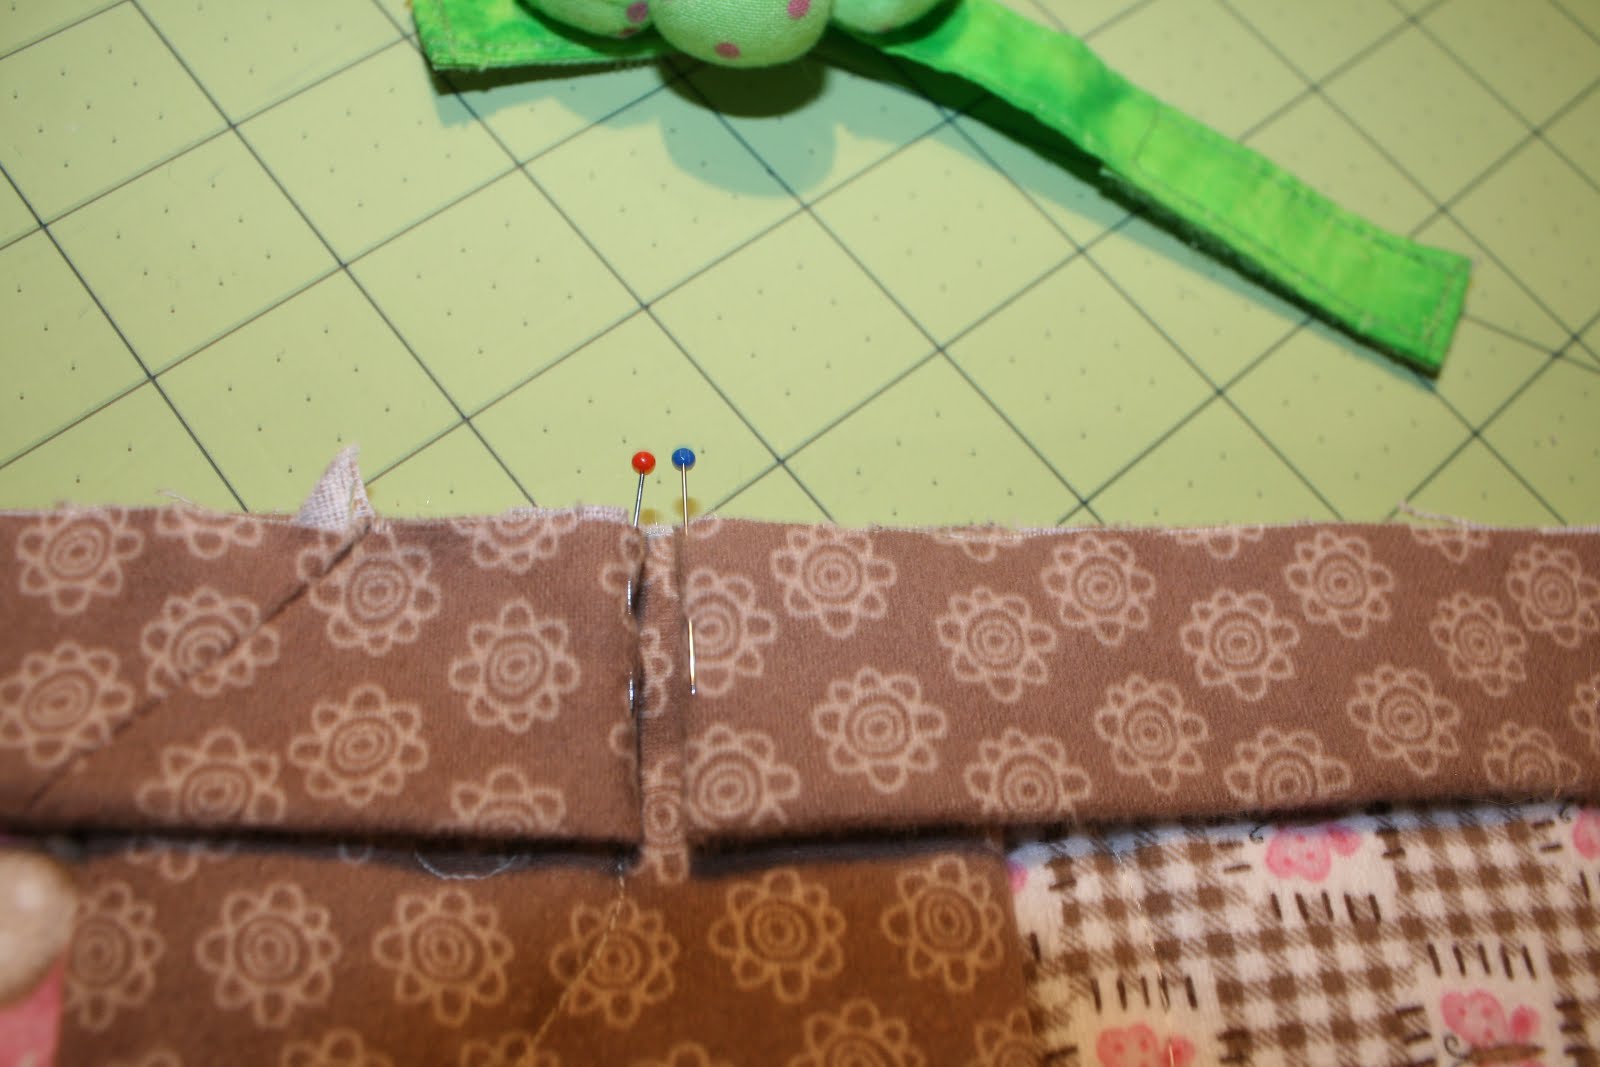
When you reach the side that you started on, end your binding with an opening about 12". You then want to fold both sides with about 1/2" open. Mark (see the pins) This is where you will sew the binding together.
Before you trim -- place the binding down on your quilt to make sure it lays flat. You want to make sure it is a perfect fit. Trust me, it's much easier to open this seam and take in a bit more if it it doesn't lay flat or there is too much binding. Once you are good to go, trim the ends of that binding to 1/4" and then finger press the seam open, fold the binding back in half and sew down the rest of the binding.
VOILA! Practice makes perfect! I hand sew the binding to the back of the quilt with small stitches, using thread that blends in with the binding. I have tried to sew the binding on in one step, but personally I don't like the look of seeing a seamline on the front and back on the binding. I love how it is invisible by taking the time to hand sew the back. Personal taste is all!
So my youngest...your quilt is now on it's way back to you. It's sure to be loved by the little wee one that you are gifting it to! Next quilt, you are on your own! I'll talk you through it!
Happy Quilting all! On to the next big "secret" project!
Sunday, January 6, 2013
KoboArc, Accuquilt and a birthday! (ohhh....and fabric!)
Happy New Year! My birthday is days after the celebrations! I was a spoiled gal and was given a new KoboArc by Chef Murphy. Can blog reading get any better! I can browse, update, read anywhere with the internet hooked up. OK so I'm not a true geek because I don't know the proper names to all the electronic thingies. I'll learn slowly and I'm ok with that! Anything new is a challenge, but a grateful one! I was looking at purchasing a tablet as I always browse for new ideas and blog hop to find out what everyone else is doing. Then I was looking at a new laptop, but then again, it's pretty hard to use on public transport, etc. Chef Murphy couldn't have found anything better! I am thrilled!
A lovely package arrived at the door after we arrived home from my birthday celebrations. I love Keepsake Quilting! They are fantastic! I find that their sales are too hard to resist. I try and buy a bundle of their fat quarters for $99 after every season. I am working hard to build my stash and find that I am overwhelmed when I go shopping for fabric. So many choices! How do you pick? Slowly I am getting a decent stash together and am starting to fulfil those dreams of finishing more quilts! If I have a certain project with certain colors, I would go out and just buy fabric for that particular project. Then, the project would be done and I would search for another project and buy fabric according to the recommendations. I never stretched out and went against the color choices. Silly as it is, I was too afraid to try other colors because it might look "stupid". As they say, there is no wrong color choice! I started reading about color choices and color saturations, etc. I started buying my own colors of fabrics for those new patterns. It was refreshing and at the same time terrifying. Why terrifying? If you buy all that fabric out of funds that could be used differently, and the hours to cut, sew and then it turns out horrible? Chef Murphy has been incredibly supportive with my hobby. He calls it "talent", I smile at him and thank God for this man who encourages and indulges me with my love for fabric! He is the one that plans those trips to include fabric and quilt shops and hunts down the addresses. So many times I've been surprised with a side road drive only to find that he's parked outside of a little quilt shop!
If cat's could talk, this one would say, "Take the picture alreadly so I can continue staring that squirrel down outside!" Along with my fat quarters, I bought a layer cake and matching jelly roll. I find that I can quickly throw together a quilt with pieces that are already cut. Working full-time makes it a bit difficult to fit in time to sew as I have to put in time cutting and the like. I'd like to just sit down and sew, sew, sew!
VOILA! I finally did it! It was after the arrival of the jelly roll and layer cake that did it! Why am I buying these pre-cuts when I could be doing the same with my growing stash! So exciting! I have gone to all the quilt shops in Calgary and of course the sewing store where I bought my Symphony. My travels led us (Chef Murphy in tow!) to Out of Hand Needle Arts located in Lakeview in Calgary. http://www.out-of-hand.com/ I've been there a couple of times to buy fabric and they have a fabulous selection of ribbons not to mention all those yummy fabrics! Deirdre was full of great ideas and information and was fabulous with all the questions that Chef Murphy asked. Terri was great when it came to choosing dies to start with. His prior experience with quilt shops here in the city have been totally negative. Bless his heart. On Valentine's day he walked into one of the quilt shops where he was looking for "red fat quarters for my honey". This is the man that has terminology down and knows what he is looking for. The woman he encountered said, "We don't have anything like that," and then (because it was Valentine's Day) continued to say, "You sure are leaving it a little late!" Now being in customer service myself, I've seen how they treat him in quilt shops. Deirdre and staff were so welcoming and so different than the other shops in Calgary (especially when it comes to a man in a quilt shop)! Thank you all for that! Regardless of the sex of the customer, what happened to, "I'll be right with you!" (when they are busy with another customer), or "How can I help you?" or "Is there anything special that you are looking for?" AND what about a SMILE? I am not surprised why a man (who doesn't quilt) wouldn't want to step in within two feet from the front door! Thank you Out of Hand for being so welcoming to my honey! I am sure he will be back!
Happy Quilting everyone!
:-) Birthday Girl Margo!
Sunday, December 16, 2012
My favorite assistant!
Well Little Man was over this weekend for a sleepover at Nana's and Grandpa's. Trying to get him to work on a project for his Momma was a NO GO! He was quite happy to be my assistant though! Here he is holding up my latest project! Pretty good assisting for a 3-year old!
This is the baby quit for my cousin in Hungary. By the time Canada Post will get it there, I am sure the baby will be a year old! Nevermind...it will still be cuddled! This is the first project that I really practiced my free motion quilting on. Here's a closeup of some of the stiches. The only one that I actually drew on was the "A" outline. It sure gave me more confidence with each triangle that I did. A good wash gave it the super-soft cuddle to it and Little Man gave it an extra cuddle since it was going to one of his cousins!
I used 100% Egyption cotton in the bobbin and the top. One thing I did notice was a whole lot of lint build-up. I had to clean out the machine twice and re-thread the machine twice. The way it stitched was great. Some of the designs were super easy and yet some of the others not so great. I think that practice will improve my stitching somewhat. It was worth taking the free-motion class with Lorraine Stangness. It sure took the fear out of free-motion. Now I get to experiment with different threads and needles. Not too crazy though! One step at a time.
The pattern is Chop Sticks by Jaybird quilts.
Wednesday, December 5, 2012
Back to Winter...goodbye Nevada!
Well Chef Murphy and I took a break to go to Phoenix, Nevada on a FART (Fabric Acquisition Road Trip!). Of course anything to do with fabric is a blessing and Chef Murphy found a place for cheese making supplies! Both of us were thrilled!
This is what we left:
After arriving in beautiful Phoenix we went here:
We went to Flagstaff this time (WTF = Welcome to Flagstaff!)
At the stroke of midnight in Flagstaff, the giant acorn drops to bring in the New Year! Wonder if they have insurance on that thing in case it bonks someone on the head? ha ha!
Then we continued our trip to Sedona for sunset:
The pictures are never as nice as they are in person! We tried to get to the top of the airport vortex area to feel the "spirits" but there was no parking at all! Maybe the next visit we will make it!
We continued our trip to Jerome -- now you gotta see this place! It's an old mining town that's built on the side of the mountain top. We stayed at The Connor Hotel -- the original one that is true to it's roots. I'll give you a peek at the room. This is an amazing little town to visit if you are in the area. Very touristy, thus the prices of everything is reflected the same. The food was fantastic and we were very happy with our stay. Take a look at the great tin ceiling and the remnants of one of the older buildings.
When we left Jerome, we headed toward Prescott and on our drive found an interesting area that was advertised for home sales. We decided to take a little drive in and see what it was all about. Take a look at this house! How would you like to live here?
Our final stop was Prescott and then off to Phoenix where we would shop some more! In the middle of no where look what we found!
so on to some fabrics! Take a look at the new additions that I found to add to my stash!
Some of the larger pieces of Christmas fabric is for some tree skirts that I have planned. I hope to get to those in the next week. I also picked up a new book on Free Motion Quilting! What a wonderful resource! Hope I can become as great as all of you out there!
Now I don't pay much attention to buying all coordinating fabrics when I am adding to my stash. If I love the fabric, I buy it! I don't stick to any one designer as I believe they all have their gifts and choices of colours. I love batiks and I've found some great "cheapo" fabrics that were 100% cotton that fit in quite nicely. I "feel" the fabric. You can tell some grades of fabrics are not as "sturdy" as others. I don't wash my fabrics and have not had trouble with it. I do use a colour catch when I wash and I personally love the puckering that takes place once it's washed. In my early quilting days I was told that you HAD to wash, and you HAD to press and you HAD to use templates! Well first of all I hate being told what I HAVE to do and secondly, the easier, the better. Personally I can't see the difference between quilts that had pre-washed fabric to quilts that did not have pre-washed fabric. It's all a choice. If you have reds in your quilt, watch how you wash it. You wouldn't put a red blouse in with your white blouse now would you? If you like pink, then take the risk. So again -- it's choices!
My favorite shop of course in Arizona is 3 Dude's Quilting. Ray has a new pattern out (like my Arizona quilt that I did earlier this year). He is in the process of writing the pattern now and it will be available on line for purchase. Well worth every penny I am sure. He was kind to offer his first pattern for free, and it's still free if you visit their website. Check it out! www.3dudesquilting.com
Here's one of Ray's patterns that I picked up this past week:
One of the classes that you can find in the shop is this one: (of course I had to bring the pattern home!)
I hope that I've inspired you to dig out those fabrics and get sewing! I've been busy with my free-motion quilting of a baby blanket. I'm hand-stitching the binding and it will be photo-ready before it hits the post office! I'm not so afraid anymore and hope that this opens up the doors to more free-motion! Though, Karen, my long arm quilter is NOT off the hook! haha! I'll be still bringing her my bigger projects to do! I have some that are being worked on now but won't be posted as they are surprises for some people! Happy Quilting everyone!
Saturday, November 10, 2012
Free Motion Quilting Here We Come!
Saturday I finally found myself back in a class -- after so many years! I think my first class was in 1996 and then a hand quilting class followed. That was it! The rest of my quilting experience has been by trial and error, the purchase of way too many magazines, and the books! So finally, I decided that I couldn't do it all on my own! I so admire those who can! I have ordered CD's and own numerous "free motion" books and have read into the wee hours trying to figure out how I could do it. What I discovered was I needed hands-on and someone over my shoulder telling me what I was doing wrong. Along Came Quilting was hosting Lorraine Stangness with a free motion class for a Saturday. I paid for the class and waited patiently!
Lorraine's class was so enjoyable and her instructions in class (and her book)were so easy to follow! We had lots of time to practice the new stitches and great feedback from her. The only comment the majority of us had was it would have been nice to have a morning class and then head home for the week to practice and then come back the following Saturday for another morning. The full day class was exhaustive, but so worth it! Lorraine is an amazing teacher and hope that she has more classes to come!
Here's a sample of my "practice" squares. You can tell that I need LOTS of practice! I'm not so terrified and look forward to practicing!
After practicing again today, I started quilting a baby quilt that is to head overseas. Of course, I had an instant helper! Take a look:
When quilting gets to THIS point, you have to shut the machine down and call it a day! Happy quilting everyone!
Subscribe to:
Posts (Atom)