Showing posts with label machine applique. Show all posts

Monday, April 3, 2017

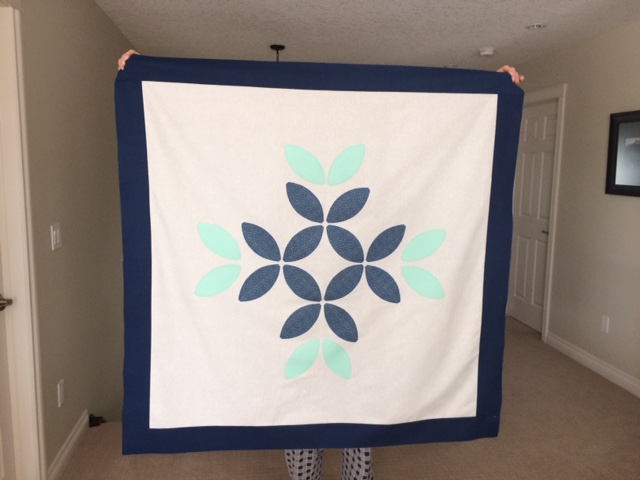
Snowflake Applique

I must have a short attention span because I have to constantly switch up my projects and take on more and more and more.

My WIPs (work in progress) are getting a bit out of hand. Does anyone else have this problem? This was my latest WIP however I have motored along and got this one completed.

I love looking at Pinterest and getting new ideas and I came along a picture of a very simple snowflake design. These days I am determined to only use my stash! So I dug through my messy fabric stash drawer seeing if I had any fabric that would work for the "Snowflake".

Fast forward through all the digging and it turns out I was in luck. I had all the right fabric colours, turns out most of the fabric I picked was from Fridays Off. Now all I needed was some guidance from my all knowing "Mom". I have never attempted applique before and you know "Mom knows best".


I was drawn to this pattern for its simple yet impactful design.
Plus I have been wanting to use my new orange peel template.  


After a long sew day at Moms 
(me sewing & mom teaching - she is still recovering from her 2nd hand surgery)
I had the top completed in no time. I have no idea why I never attempted applique before.

My amazing Husband was gracious enough to hold up the quilt top for me =D


Next was the basting. My mom read about a new technique called board basting and she thought I would be the perfect student to test it out.

It worked perfect and I easily basted the entire quilt MYSELF - yay! Usually it helps with a second set of hands for basting but seeing that my Mom is out of commission I was out of luck.

I was flying solo, and it worked out fine.


 Usually I have my quilts professionally machine quilted but it was decided that I should do this one from start to finish. I am a BIG NEWBIE when it comes to machine quilting and was laughing uncontrollably and at the same time thinking "What have I done" HAHA 


HOWEVER in the end I think the quilting actually looks really great.
Why oh Why must I second guess myself.


This quilts new home will be for an adorable baby boy who was born in January. A blue snowflake quilt for a beautiful winter baby.


Until next time
- The Youngest-


Saturday, April 4, 2015

Happy Easter!


Passing on a little Easter goodness! I got two of these kits from my retreat, courtesy of Nimble Thimbles Quilt Club! Love, love, love!


Now I am new to any type of machine applique. That means I am trying out new stitches, new thread and of course what to do with stabilizer. This little project is Phyllis' fault!
 She tackled these at Retreat and said it was pretty easy! 
 Thanks Phyllis! I couldn't be happier with the outcome of these!


I had bought a wee bit of Tear Away a while ago - and had no idea where to start. There was a shiny side and a  sticky side. I put the sticky side down to the back of the tea towel and used my iron to press it a bit. It stuck to the fabric and not to my iron thank goodness!! Who knew! It didn't stick permanently though, but enough that it would let me stitch the pieces down. When I was done -- simple -- it tore away! [duh!] I have so many stabilizers and sticky papers that I have to start labeling everything! I do believe that I need to educate myself on these things! I am very happy with the outcome though! It was tons of fun and took about an hour and a half for each - which included tracing, fusing the pieces to the iron and then stitching around the pieces.


Then I thought, I needed to do the other one! Though on this one I started to stitch everything in phases. I stitched the leaves and then put on the next pieces and stitched those down. It turned out cute! I think I do need practice on my stitching -- but everything gets better with practice, practice, practice! 


Chef Murphy let me put one on the oven handle! We need a little Spring in the kitchen with all this miserable weather we have been having! Last night it was snowing again! Though not enough for it to stay on the ground, but chilly enough to want to stay indoors and sew! I feel like I accomplished something this weekend!


Happy Easter all! God Bless each and everyone!

Margo

Sunday, August 24, 2014

Another Finish!

Another finish! Yeah! This one took a long time. Partly because I was afraid of the machine applique (still am....ask me what I think once I take the quilt out of the wash!), and partly because of my arthritis in my thumb -- which the latter, of the two, kept me away longer than I wanted!


It's not a big quilt. The little man is now 4 months old, but it's still a great size to cover him in the winter months and for him to drag around as a toddler. Mom told me the room was blue's and brown's and that they were focusing on an "airplane" theme. I found lots of patterns, but they were so much more grown up (outlines of large jetliners).

The pattern is called "Fly With Me" designed by Kristen Grassaway. I found it as a .PDF pattern at Connecting Threads. http://www.connectingthreads.com/Patterns/Fly_with_Me_Pattern_Download__D10316D.HTML She has a lot of cute patterns. I found the cutting instructions a bit confusing and had to paste little fabrics to the pattern cutting directions. I'm one to "make it up as you go along", so patterns are not my forte. I usually look at it and work it out myself. Remember, I'm the girl that HATES math -- so that's probably more than half of the problem!


I have always thought you "HAD" to have one piece for the back! Well I still wanted to incorporate some of the blue in the background from the front. I ended up having a whole new quilt on the back with the whales and a couple of stripes of white through the back. Of course I had to use my "black and white text" binding. I think it gives the whole quilt a bit of a lift without taking away from the whole quilt. Have you ever seen quilts where everything is nice and then the binding just screams "I DON'T BELONG ON HERE!!!!"


My applique is a work in progress. I used minimal lite fusible web ...meaning the body of the plane on the insides does not have fusible. I only have about a quarter inch of fusible around each pattern piece to hold it down. The wings as well have only the fusible web along the outside edges as well, as I cut the middle out. The windows and front windshield have webbing for the whole piece. Another thing that I did was put fray stop on the ends of each part that my thread was cut. I don't want it to fall apart until it's "worn" apart, if you know what I mean! I used matching thread for each piece of the applique and a small zig zag. It's not perfect, but from farther away it looks just fine! I think this helped me overcome my fear of machine sewn applique! Those little windows are smaller than a dime. Best advice: GO SLOW, take your time around corners and watch where your needle goes up and down. I'm happy with the outcome and wouldn't hesitate tackling this again -- except maybe tackle it sooner rather than later!

TIP: as the applique pieces are on one piece of fabric -- I zig-zagged the edges before putting together the rest of the quilt. The blocks were much easier to maneuver  around all those curves!

Thanks to my long arm quilter, Karen! The simple quilting is just great and "enough". Sometimes people over-kill on the quilting and lose the simplicity. It's just "right" or this little one! I wanted this quilt nice and soft so he could cuddle it around him!

Now, on to the arthritis. I have been typing all my life (from when I was 12). I remember the typewriters where you had to pound on the keys and throw the carriage to the right (you know what I mean if you ever typed on a manual!). Put that with always using my hands for crafting! You name it, paining, ceramics, croheting, knitting, Bunka, etc., etc.Flash forward to now, the joints are now wearing thin. I have had my second injection of cortisone into the joint and it hasn't helped much this time.

Using your hands all the time and in particular "pinching" fabric between your pointer finger and thumb hurts! (bubye for now those hand-pieced hexagons).  Putting my hand onto my rulers to hold down and cut fabric is another challenge.

Wearing one of these is a pain in the butt, but it does help with the pain somewhat. It's pretty hard to hold stuff that needs "delicate" touch. Meantime, I do what I can to get these projects done! If any of you have experience with this, I would sure love to hear about your journey through this. I suspect as I age, I will be having more issues! I just want to be able to continue to quilt! (Not to mention I have some years before I can retire! -- the last 7 years or so, I have been typing way more! Heaven forbid with the newer generations and all their "texting!" Can't imagine what's going to happen to them!

I'm going to try and take a hiatus and send my Babylock Symphony in for a spa day or two, so I'll just be content with folding my fat quarters and organizing the rest of my sewing room! I've got more planned to sew, but I think it will be a bit before I show you all any finished projects!

Meantime, think of me when you are sewing and as always.....
HAPPY QUILTING!

Monday, June 2, 2014

Applique here I come!


Machine applique is not my favorite. It is probably  because I am new to it. I am learning how to machine applique so that it looks like an expert did it and not someone as idiotic as me! ha! I seriously need all the help I can get. I will continue to try. They say the more you try the better you become at it. 

This little airplane quilt is long overdue. The wee babe is over 6 weeks old and I still have to cut more fabric for this one. I think my hesitation is because I want it to work out well. It's something I am not comfortable with, but that is the part of learning new skills. One step at a time! Because it's a baby quilt, I know it will be going though the wash. I want it to last through all those washings without the edges fraying. Tomorow...I'll tackle it tomorrow! (I've been saying that for weeks!)

Maybe if I promise on here that I will work on it tomorrow -- I will HAVE to work on it! Voila! Maybe that's the trick!

Happy Quilting all!

Monday, February 24, 2014

What do you do when baby arrives early?

I had all these elaborate plans on making a fabulous "superhero" quilt, but the little man arrived EARLY! Egads! I rushed out and found a superhero cape panel. Well what can you do with something like that? I took it apart and re-assembled (in a hurry !) I added extra pieces with the colours Momma requested, and added "Jacob" to the front.


Hanging it isn't quite as nice as displayed on a fence or somewhere with more pizazz -- but it is nice and square when laid flat! The colours are bright and should keep the little man occupied when he's having tummy time on the floor!

My great longarm quilter Karen did a fabulous job! I love how she has the stars in there. She backed it with incredibly cozy Cuddlesoft in a bright red! I just wanted to wrap myself up in it! It's a great weight!


I am new to machine applique and did have a nice satin stitch around the pieces. Once it was complete with the binding, I put it in the wash. I pulled it out and many of the edges were unraveling -- thus having to go on TOP of the applique's again and re-do it with a wider stitch. It worked! Yeah! saved! I always wash my quilts before handing them over  to make sure everything holds and puckers nicely. Unfortunately my photo's do not show as well on here, but I grabbed a couple of quick photo's with my point and shoot. The quilt is already to go to new baby!


I wanted to add a fun binding but I didn't want it to look like a candycane by placing it on a diagonal. It sure does add some more interest to it. Binding is my favorite part of the quilting process believe it or not! I love sitting in front of the TV with a cozy quilt on my lap, hand stitching the binding to the back.  I challenge myself every time to make smaller and smaller stitches to near invisibility. Just to see the finished product is worth it -- even if it's a quick quilt! 

Only one more to go -- but that particular little man is staying put for a couple more weeks! I'll be crossing my fingers that he holds out for his due date so I can take some more time for this one! Again, some more applique! SIGH.... maybe with each one that I do, I learn more and more? If anything, I won't be making the same mistakes!

If any of you have any tips on how to get that nice finished product via machine, let me know! I would love to hear how you get it done! (Without having to un-sew and say choice words throughout the process!)

Happy Quilting everyone!

Wednesday, May 29, 2013

Machine applique done!

Forgot to post photo's from yesterday's photo day! The weather was so beautiful outside!


This little wall hanging is with an assortment of batik charm squares that I had. The leaf shapes were traced onto fusible web and then ironed on to another 5" charm. The pattern is simple. Just layer two charm squares (good side to good side) drawing a line from one corner to the opposite, then stitch 1/4" to the side of the line you just drew, then stitch down the opposite side. Cut down the drawn line and open so you now have two squares. press the seam open.
(sorry I don't have a photo of that step. Hope this makes sense)

Step One: Using a lightweight fusible web, draw your leaves on the paper side of the web.


Step 2: Cut roughly around the leave shapes. Place the roughly cut leaves onto another 5" charm square, fuse onto the fabric.

Step 3: Let cool and then cut your leave on your traced line. 

Your traced line is not cut yet. Place your design with enough room around it and fuse this to the "wrong" side of your fabric. Then trim along your traced line for the final shape that you want to put onto your quilt
Step 4:  Peel the backing off your cut shape


Step 5: Place the wong side of your shape on top of the good side of where you want to place it (Remember once you press it on at this point, you will not be able to remove it! Make sure you are ok with your placement BEFORE you press)


Step 6: Use a simple zig zag or blanket stitch around the edges of the applique.


Step 7: Once all your squares have their leaves with the stitching completed, then arrange in the pattern you want and stich your squares together.   Step 8:  and quilt as you normally would.    For quilting, I just stitched in the ditch and put my binding on. That's it! It's a great little pattern that has endless possibilities. I liked it because I was able to practice that machine applique. If I screwed up one little leaf...oh well! I tried different fusible webbings as I didn't know which one would be easier to use.


ABOUT FUSIBLES


When you have fused your fabric to one side, you need to peel off the paper from the wrong side as well. You will note this side is dull (as well it feels a bit like there is rubber on the side you are going to fuse to the top of your quilt). The dull side goes down on the top of your fabric.

Dull Side

Good side -- this side is visible

TIPS:  when using your sewing machine to applique the edges, use a new microtek needle. I find these are much sharper and depending on the fusible that you use, will go through the layers without sticking to the needle. If you find your fabric is lifting with the needle, change your needle.

Make sure you allow the fusible shapes to cool off during each step. Do NOT try to sew these on when they are warm -- you don't want the glue from the fusible to gum up the needle or gum up any part of your machine! The fusibles have improved so much over the years. The thinner, the better for virtually invisible applique.

There are lots of uses for the fusible webbing! The Little Man got his "batman cape" from his Nana! (Trust me, the Batman logo is on the back!) The next project is Superman! (this is going to be fussy to cut out! egads!)


Then there are things like Animal Whimsy (an Amy Bradley design):


Think about the final look that you want when you are using fusible applique. You can have messy edges that will fray after many washings by using a straight stitch on the edge. If you want it to pucker after a wash -- it won't, it will remain fairly smooth. The thinner, the less "crisp" the final finish is. Experiment and see what you like.

Do you have any other creative uses for fusibles? Happy Quilting! (or should I say Fusing???)

Sunday, April 14, 2013

Playing with thread

This is the first time that I am trying to work with thread as an embellishment to my quilt top. I have no idea how it will hold up when it's all quilted. I also tried machine applique for the first time a while back with this. I used a lightweight fusible for the leaves and I wasn't sure how the thread would go through. I'll have you know it was just fine! There was no sticking or slowing my Symphony down. I used my darning foot as in free-motion with the thread. It gave me a little more time to think about how I want to quilt this wall hanging.


I used Wonderfil Rayon thread (40 wt. variegated col #8227) in both the top and bobbin. I used a small zigzag with my darning foot as though I was free-motion quilting.


Eventually I'll get the knack of this, but with quilting, new techniques are only proof that you are learning and growing your creative abilities. Some of the leaves are horrid, but then again that gives it character! (especially as I wasn't about to rip out all the threads!) While I stitched away, I was thinking of all my projects that have been sitting there. I am going to work hard on getting my UFO's completed this year so every new project will be exciting. Like the wall hanging above, I'm a bit "OCD", thus the name of the quilt! You will notice one of the leaves off in a different direction to the others. I pieced the whole thing with the leaves going the same way. Months later I looked at it and thought how "OCD" it was with everything matching and no difference to it -- thus, in the middle, I took one of the leaves and ripped out the block and re-positioned it! It was my "wild" side saying screw it to have everything "matchy matchy" as my daughter would say! I threw caution to the wind in a small way and turned that sucker! So, if you look at the finished product and see one leaf in a different direction....who really is the one with OCD? :-)

I'm not one of those who likes working on a multitude of projects. I like to start something and finish it, otherwise I feel that I "failed" at the project. I know it's not reality -- and that too I am working on.....embracing projects that are not just quite finished and feeling no anxiety with starting a new one! Maybe it's the way I was brought up! You start something and you finish it! Hah! Well, I'm getting over that in a hurry -- especially when it comes to my quilting!

How are you with piecing? Can you stand the "mistakes" or are you a perfectionist that wants to rip it out until it's perfect? Are you the type of person that will do it over and over again until it's perfect?

I know one thing for sure... Tigger doesn't care how much time I spend in the studio. He just loves hanging around! Good thing I wasn't pressing too much today!


I think he was worried that I was going to give him the heave-ho! He had his forehead buried in the board seconds before this, but as soon as my flash click on he pulled up his head!

Good thing it's a snow day -- more time for quilting! Have a great one!